The Complete Cut-and-Sew Guide for Brand Owners (2026)


The Complete Cut-and-Sew Guide for Brand Owners (2026)
3 MINUTES
March 5, 2026
You have built a brand on blanks. You have mastered the art of the graphic tee, the printed hoodie, the embroidered cap. Your designs are resonating, your audience is growing, and you have squeezed every last drop of margin out of the premium blanks market. But you have hit a ceiling. A frustrating plateau where your creative vision is constrained by the color card and inseam measurements of another company's product. You are ready for the next level: cut-and-sew.
Welcome to the great leap. Moving from blanks to cut-and-sew is the single most significant transition a brand can make. It is the moment you graduate from being a decorator of existing products to a creator of new ones. It is the path to higher margins, a more defensible brand, and a product that is truly, uniquely yours. It is also a path littered with costly mistakes, predatory factories, and logistical nightmares that can sink a brand before it ever finds its footing.
This is not another blog post about finding a factory on Alibaba. This is the operator's manual, the guide I wish I had when I was making the transition myself. We will not be talking about shortcuts. We will be talking about the right way to navigate sourcing, design, development, and production. The brands that win in 2026 are not the ones with the best graphics; they are the ones with the best products. This is the guide for the builders. It is time to get to work.
Part 1: The Mindset Shift (From Decorator to Creator)
Before you can build a successful cut-and-sew program, you must fundamentally change the way you think about your business. You are no longer simply applying graphics to pre-made canvases; you are now an architect, a product developer, and a supply chain manager. This requires a radical shift in mindset, from short-term, reactive thinking to long-term, strategic planning. The brands that make this transition successfully are the ones who embrace the complexity, not the ones who try to minimize it.
Chapter 1: The Limitations of Blanks (And Why You've Outgrown Them)
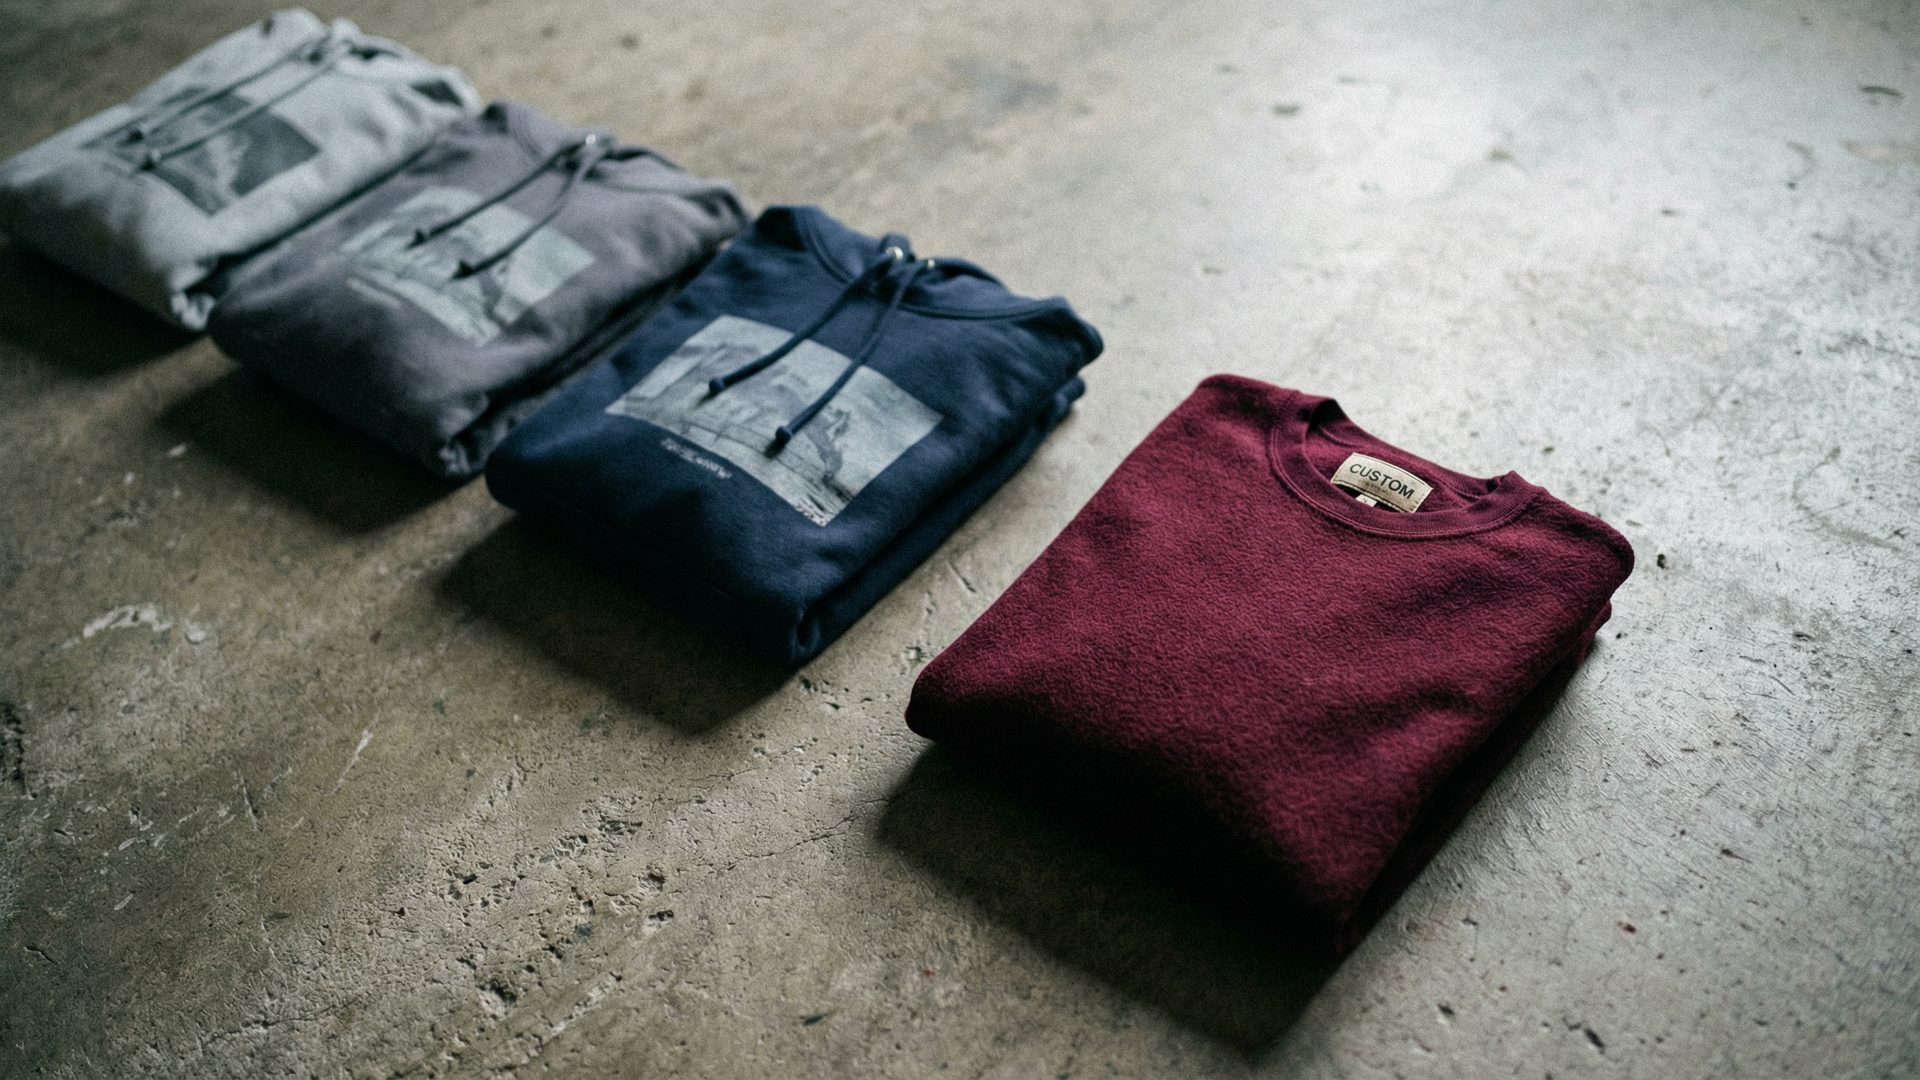
The world of premium blanks is a fantastic starting point. It allows you to test ideas, build an audience, and generate revenue with minimal upfront investment. Brands like Madhappy, Aimé Leon Dore, and early-era Supreme built significant followings using blanks as their canvas. But for ambitious brands with a clear product vision, the limitations quickly become apparent. You are beholden to the color palettes, fabric choices, and fit blocks of a handful of major suppliers. Your brand's physical expression is, by definition, generic. The very best you can be is the best brand using the same hoodie as a dozen of your competitors.
This ceiling manifests in several ways. You struggle to find the exact shade of sage green you envisioned for your spring collection. You want a heavier-weight fleece, perhaps a 400gsm brushed-back terry, but your supplier only offers a standard 330gsm option. Your female customers complain that the unisex fit is too boxy. These are not minor inconveniences; they are fundamental constraints on your brand's potential. The decision to move to cut-and-sew is not just about wanting a custom color; it is about recognizing that your vision has surpassed the available tools.
Chapter 2: The Economics of Cut-and-Sew (The Margin and the Moat)
The creative benefits of cut-and-sew are clear, but the financial implications are just as compelling. Moving beyond blanks is not just an investment in your brand; it is an investment in your margins and your long-term defensibility. A product-first brand is a more profitable and a more resilient brand, and the numbers bear this out clearly.
The most immediate financial benefit is the potential for significantly higher gross margins. While the per-unit cost of a cut-and-sew garment will be higher than a blank, the potential retail price is exponentially higher. A blank hoodie that costs you $20 to purchase and print might retail for $60, a 3x markup. A custom, garment-dyed, heavyweight hoodie that costs you $40 to produce can command a retail price of $150 or more, a nearly 4x markup. This is because you are no longer selling a commodity; you are selling a unique product that cannot be purchased anywhere else. The customer is not just paying for a hoodie; they are paying for your brand's specific vision, executed at a level of quality that justifies the price.
This uniqueness also creates a powerful competitive moat. When your brand is built on blanks, your only differentiators are your graphics and your marketing. A competitor can use the same blank, a similar graphic, and a lower price to steal your customers. When your brand is built on a custom-developed product, your product itself becomes a barrier to entry. A competitor cannot simply copy your design; they would have to replicate your fabric, your fit, and your finish, a process that would take months of development and significant investment. This gives you pricing power and a much more loyal customer base.
Chapter 3: The "Product-First" Mentality
Successful cut-and-sew brands are product-first organizations. This means that the physical product is not an afterthought or a vehicle for a graphic; it is the core of the brand. The fabric, the fit, the construction, and the finish are the elements that create a lasting connection with the customer. A great graphic on a cheap blank is a fleeting trend; a perfectly constructed garment is a piece of a customer's life.
This shift requires a new level of obsession with detail. You must learn to think like a product developer, to consider the drape of a fabric, the feel of a seam, the weight of a zipper pull. You must become a student of the craft, to understand the difference between a flatlock and an overlock stitch, to appreciate the nuance of a garment dye versus a pigment dye. This does not mean you need to become a technical designer or a pattern maker. It means you need to respect the craft enough to hire the right partners and to ask the right questions. It means you need to care about the product as much as you care about the brand.
Part 2: The Playbook (From Concept to Golden Sample)
This is where the theoretical becomes practical. Moving from a product idea to a physical, manufacturable sample is a multi-stage process that requires precision, communication, and a deep understanding of the production lifecycle. This part of the guide will walk you through the critical steps of finding a manufacturing partner, creating a technical specification, and navigating the iterative process of sampling.
Chapter 4: The Sourcing Minefield (Finding a True Partner)
Your choice of manufacturing partner will be the single most important decision you make in your cut-and-sew journey. This is not about finding the cheapest supplier; it is about finding a partner who can translate your vision into a high-quality product, who can scale with you, and who can help you navigate the inevitable challenges of production. The world is full of factories, but true partners are rare.
The most common mistake brand founders make at this stage is what we call "The Alibaba Trap." They search for "custom hoodies" on a massive B2B marketplace, get overwhelmed by thousands of listings, and end up choosing a vendor based on a low price and a slick product photo. This is a recipe for disaster. These platforms are designed for sourcing generic, low-cost goods, not for building a nuanced, quality-first apparel brand. You will be communicating with a sales rep who has never set foot on the factory floor, your tech pack will be misinterpreted, and the sample you receive (if you receive one at all) will bear little resemblance to your vision. The few dollars you save on the per-unit cost will be dwarfed by the money you lose on unsellable inventory and the time you waste on a dead-end partnership.
A much more effective approach is to seek out a full-package production partner. This is a company that manages the entire process for you, from sourcing the raw materials to managing the factory relationship to ensuring quality control. They act as your outsourced production team, providing the expertise and the infrastructure that you lack as a growing brand. While the per-unit cost may be higher than going direct to a factory, the total cost is almost always lower. A good full-package partner will save you from costly mistakes, ensure a higher-quality product, and free you up to focus on what you do best: building your brand.
When vetting potential partners, whether they are a full-package provider or a direct factory, there are several key areas to investigate:
• Specialization: Does the factory specialize in the type of product you are trying to make? A factory that primarily produces basic knit t-shirts is not the right partner for a complex, technical outerwear piece. Look for a partner who has a deep portfolio of work in your specific product category.
• Client Roster: Who else do they work with? If a factory is producing for well-respected brands in your space, that is a strong signal of their quality and reliability. Do not be afraid to ask for references, and always follow up with them.
• Communication: How do they communicate? Are they responsive, clear, and professional? Do they have a dedicated account manager for your brand? Language barriers and cultural differences can be a significant challenge when working with overseas factories, so it is critical to find a partner who you can communicate with effectively.
• Transparency: Are they willing to be transparent about their process and their pricing? A good partner will be happy to walk you through their production process, to provide a detailed cost breakdown, and to answer your questions directly. A lack of transparency is a major red flag.
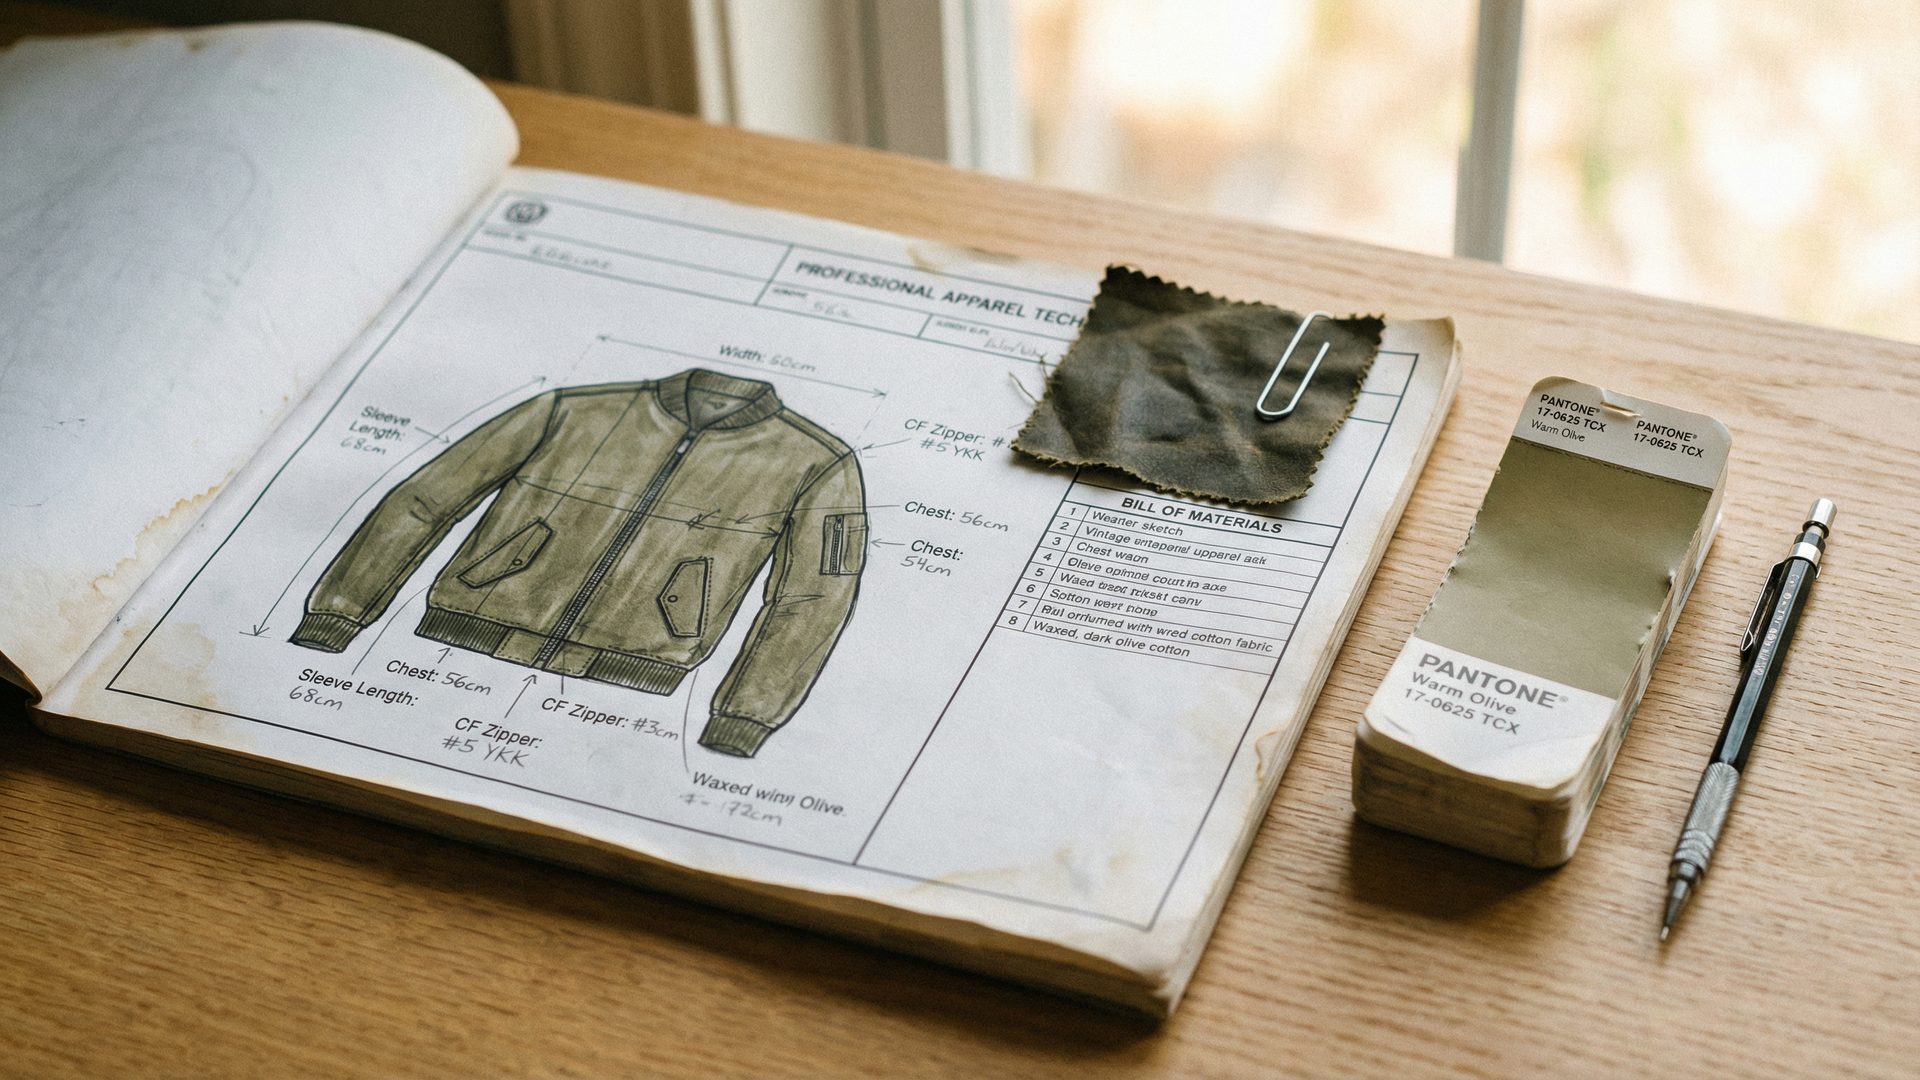
Chapter 5: The Tech Pack (Your Product's Blueprint)
In the world of cut-and-sew, the tech pack is everything. It is the universal language of apparel production, a comprehensive document that tells the factory exactly how to build your product. A vague or incomplete tech pack is the primary cause of sampling failures, production errors, and budget overruns. A detailed, professional tech pack is the foundation of a successful production run.
Your tech pack must be a masterclass in specificity. It should leave no room for interpretation. Every single detail of your product must be documented, from the obvious to the minute. This includes:
• Technical Sketches: Detailed, flat sketches of the garment from the front, back, and side. Callouts should be used to indicate specific details like seam placements, pocket types, and hardware. These should be clean, professional vector drawings, not hand-sketched illustrations.
• Bill of Materials (BOM): A complete list of every single component required to build the garment. This includes the main fabric, any lining or contrast fabrics, thread, zippers, buttons, labels, hang tags, and packaging.
• Fabric Specifications: The exact composition (e.g., 100% cotton), weight (e.g., 400 gsm), and finish (e.g., brushed-back fleece) of your fabric. If you have a specific mill or supplier in mind, include their name and the fabric's style number.
• Color Standards: Pantone (TCX) codes for every color in the garment, including the main fabric, any ribbing, and thread. Do not say "dark green"; say "Pantone 19-0420 TCX."
• Construction Details: The specific type of stitch to be used for each seam (e.g., 5-thread overlock on side seams, double-needle coverstitch on hem), the stitch-per-inch (SPI), and any special reinforcement techniques like bar tacks at stress points.
• Size and Fit Specifications: A complete garment measurement chart for a sample size (typically a Medium), with measurements for every key point of measure (POM). This should also include a graded spec sheet, showing how the measurements change for each size in your range.
• Artwork and Embellishment Details: If your garment includes any graphics, embroidery, or other embellishments, the tech pack must include the artwork files, placement measurements, and technique specifications (e.g., "3D puff embroidery, 4mm height, cream thread on navy ground").
Creating a tech pack of this quality is a skill in itself. While there are many templates available online, it is highly recommended that you work with an experienced technical designer or a full-package partner to create your first one. The investment you make in a professional tech pack will pay for itself many times over in the form of accurate samples and a smooth production process.
Chapter 6: The Sampling Process (From Proto to Golden Sample)
Sampling is an iterative, multi-stage process. It is a conversation between you and your factory, a series of refinements that takes your product from a digital concept to a physical reality. It is critical that you approach this process with patience and a clear understanding of the different sample types and their purpose. Rushing sampling is one of the most expensive mistakes a brand can make.
Stage 1: The Proto Sample. This is the first attempt by the factory to create your garment based on your tech pack. The primary purpose of the proto sample is to evaluate the factory's ability to interpret your instructions and to assess the basic fit and construction of the garment. It is often made in a random color or a similar, in-stock fabric. You will review the proto, provide detailed feedback with photos and measurement corrections, and the factory will create a revised sample. Do not be discouraged if the proto is far from your vision; this is normal and expected.
Stage 2: The Fit Sample. This sample is made in the correct fabric and is used to finalize the fit of the garment. You will try this sample on a fit model (or yourself, if you are the fit standard) and make any necessary adjustments to the pattern. It is not uncommon to go through two or three rounds of fit samples to get the fit exactly right. Every adjustment you make at this stage is an adjustment you are not making after you have committed to a production run.
Stage 3: The Pre-Production Sample (PPS) or "Golden Sample." This is the final sample before you approve the garment for bulk production. The PPS must be 100% correct in every way. It must be made in the correct fabric, in the correct color, with the correct trims, and with all of your fit adjustments applied. This is the "golden sample," the standard against which every single piece in your production run will be judged. You must inspect this sample with extreme care. Once you approve the PPS, you are giving the factory the green light to produce hundreds or thousands of units. There is no going back.
This entire process can take anywhere from 6 to 12 weeks, depending on the complexity of the garment and the responsiveness of your factory. Rushing this process is one of the most common and costly mistakes a brand can make. A flawed PPS that is approved for production will result in a flawed production run, and you will have no recourse because you signed off on the standard. The sampling process is your opportunity to get it right. Use it wisely.
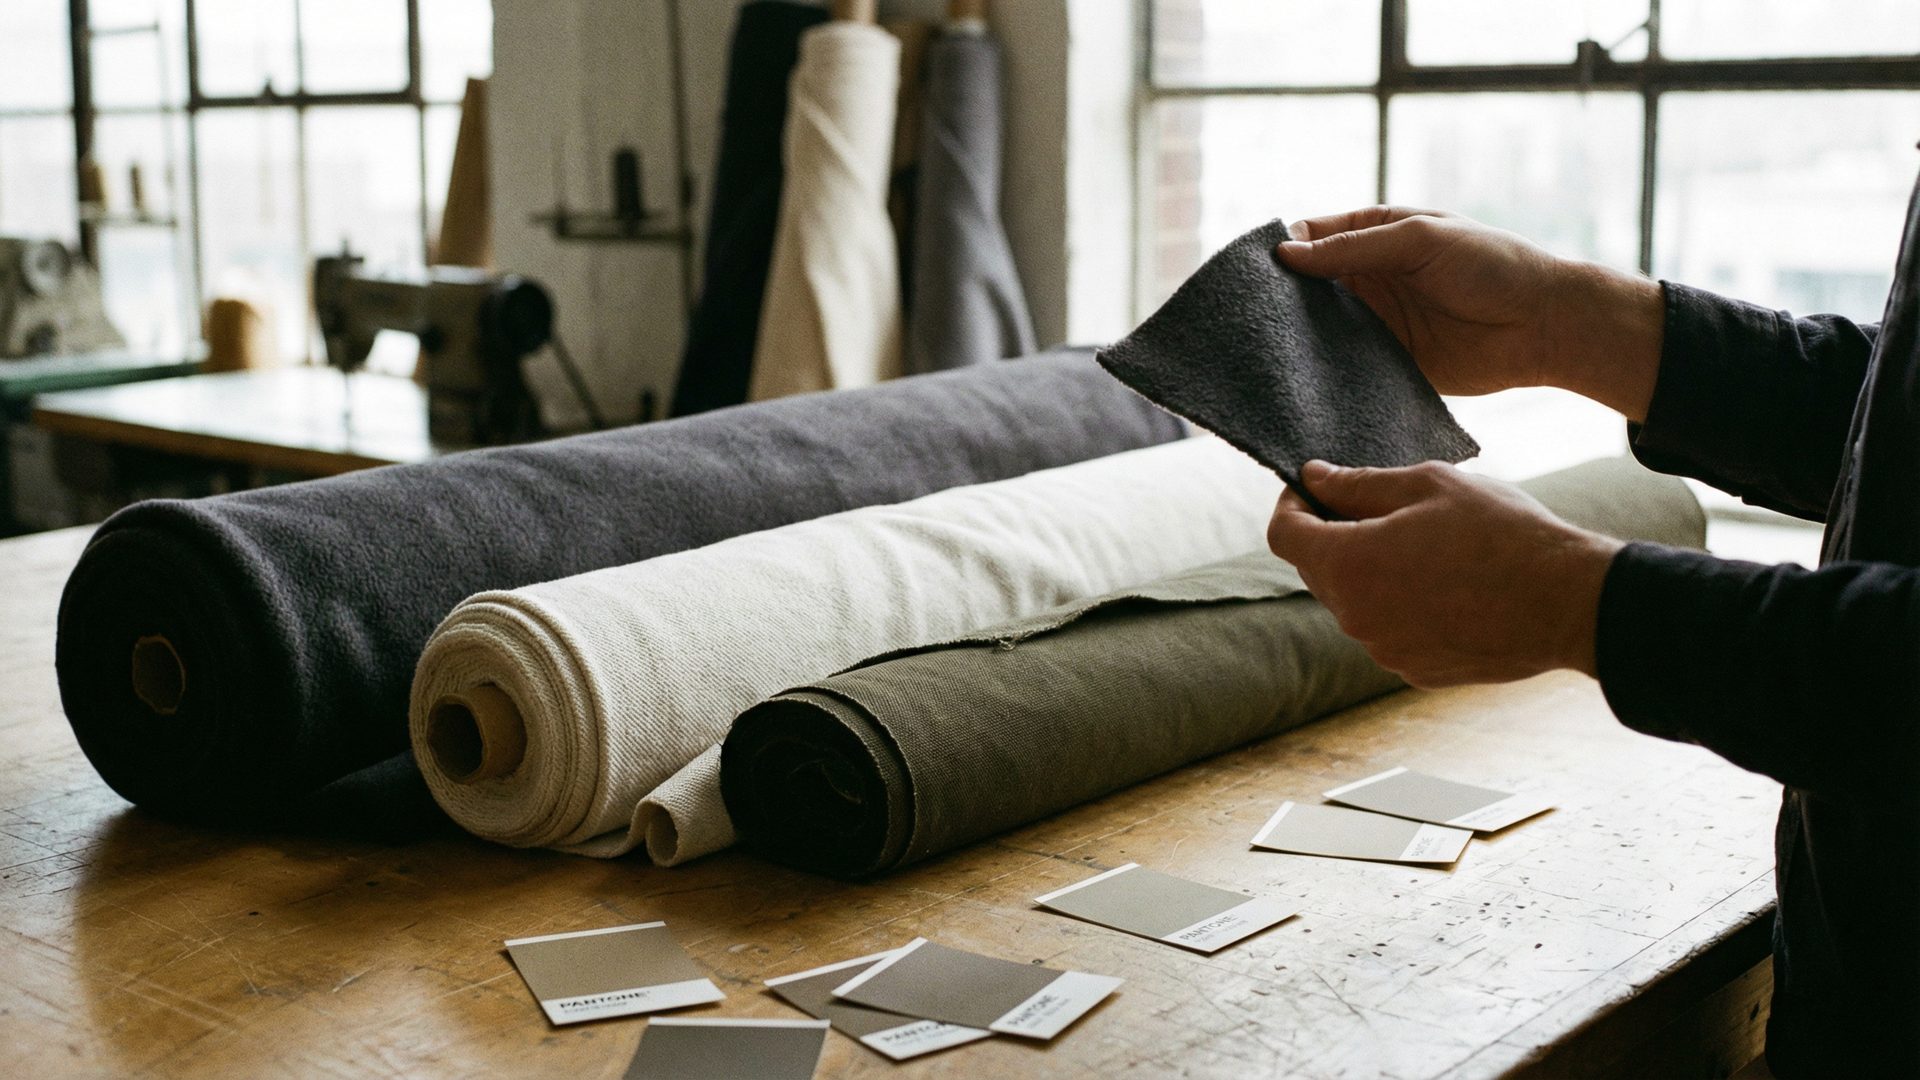
Chapter 7: Fabric Sourcing and the Art of Material Selection
Fabric is the foundation of your product. The wrong fabric choice can undermine even the most beautiful design, while the right fabric can elevate a simple silhouette into a product that customers reach for every day. Fabric sourcing is a discipline in itself, and it is one of the areas where a knowledgeable partner can add the most value.
The key variables to understand when sourcing fabric are composition, weight, and construction. Composition refers to the fiber content of the fabric, such as 100% cotton, a cotton-polyester blend, or a cotton-linen mix. Each fiber has its own performance characteristics, hand feel, and price point. Weight, typically measured in grams per square meter (gsm), determines the drape and substance of the fabric. A 180gsm jersey is a lightweight, drapey t-shirt fabric; a 400gsm fleece is a heavy, substantial sweatshirt fabric. Construction refers to how the fabric is woven or knitted, which affects its texture, stretch, and durability.
Beyond these basics, there is a world of specialized fabric treatments and finishes that can dramatically elevate your product. Garment dyeing, for example, is a process where the finished garment is dyed after it has been sewn, rather than using pre-dyed fabric. This creates a unique, lived-in color quality with subtle variations that cannot be replicated with piece-dyed fabric. Enzyme washing, stone washing, and pigment dyeing are other finishing techniques that can create a vintage, worn-in aesthetic that is highly sought after in the premium market. Understanding these options and knowing when to deploy them is a key part of developing a distinctive product.
Part 3: The Execution (From Production to Fulfillment)
With an approved Golden Sample in hand, you are ready to enter the final and most critical phase: bulk production. This is where your financial investment is truly committed, and where strong project management and a rigorous commitment to quality become paramount. Successfully navigating this stage separates the professional brands from the hobbyists.
Chapter 8: Managing the Production Run
Once you approve the PPS and submit your purchase order (PO), the factory will begin the process of turning raw materials into finished goods. This is not a "set it and forget it" process. Consistent, clear communication and active management are essential to keeping your production on track and ensuring the final product meets your standards. Your job during this phase is to be a proactive project manager, not a passive observer.
Establish a regular communication cadence with your factory or full-package partner from day one. A weekly email or call to review progress, ask questions, and address any potential issues is standard practice. You should request updates at key milestones: when the fabric has been ordered, when it has been cut, when the first units are coming off the sewing line, and when the final pieces are entering the finishing and packing stage. This level of engagement shows the factory that you are a serious, professional partner and helps to catch any deviations from the plan before they become major problems.
Production timelines are notoriously fluid. A 60-day production window can easily stretch to 75 or 90 days due to raw material delays, customs holds, or unforeseen production challenges. It is critical to build buffer time into your launch plan. If your factory gives you an estimated completion date, add at least two to three weeks to that date for your own internal planning. Rushing a factory to meet an unrealistic deadline is a surefire way to compromise quality. It is always better to launch a great product late than a mediocre product on time.
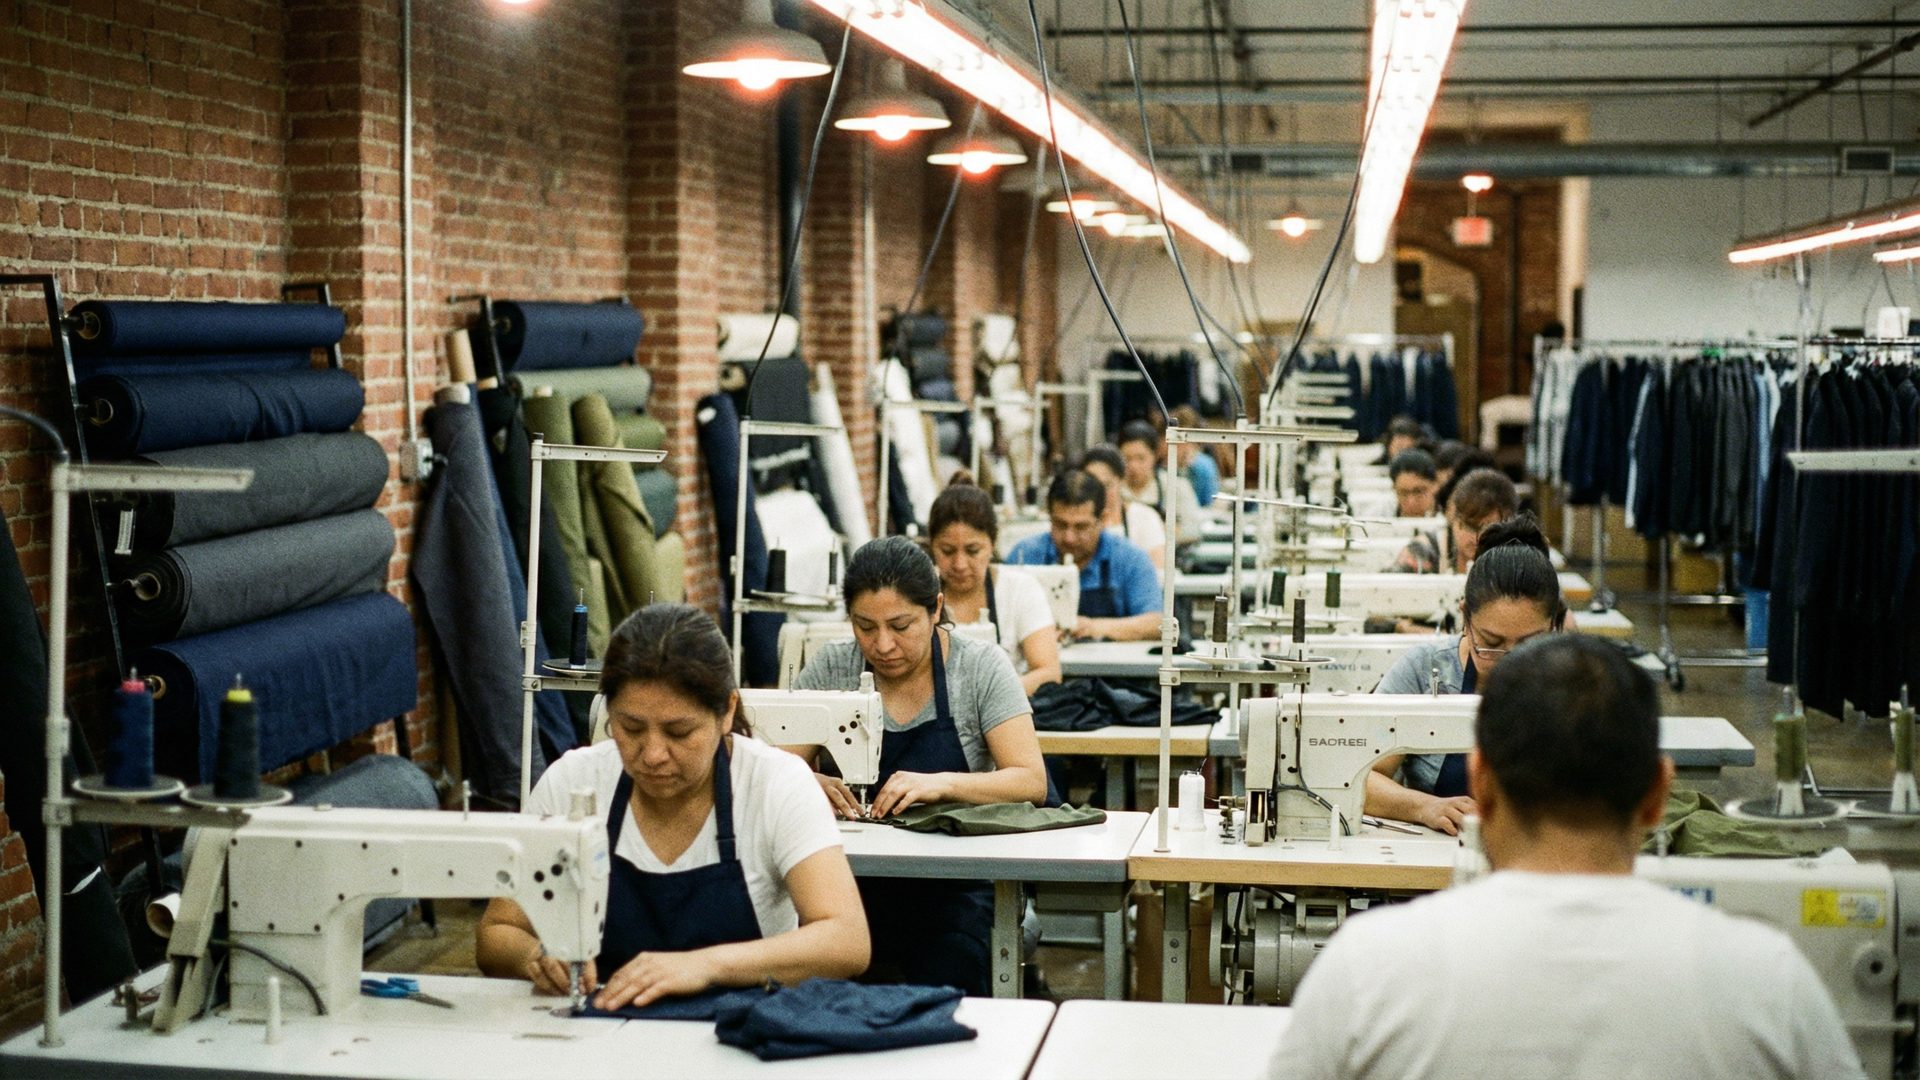
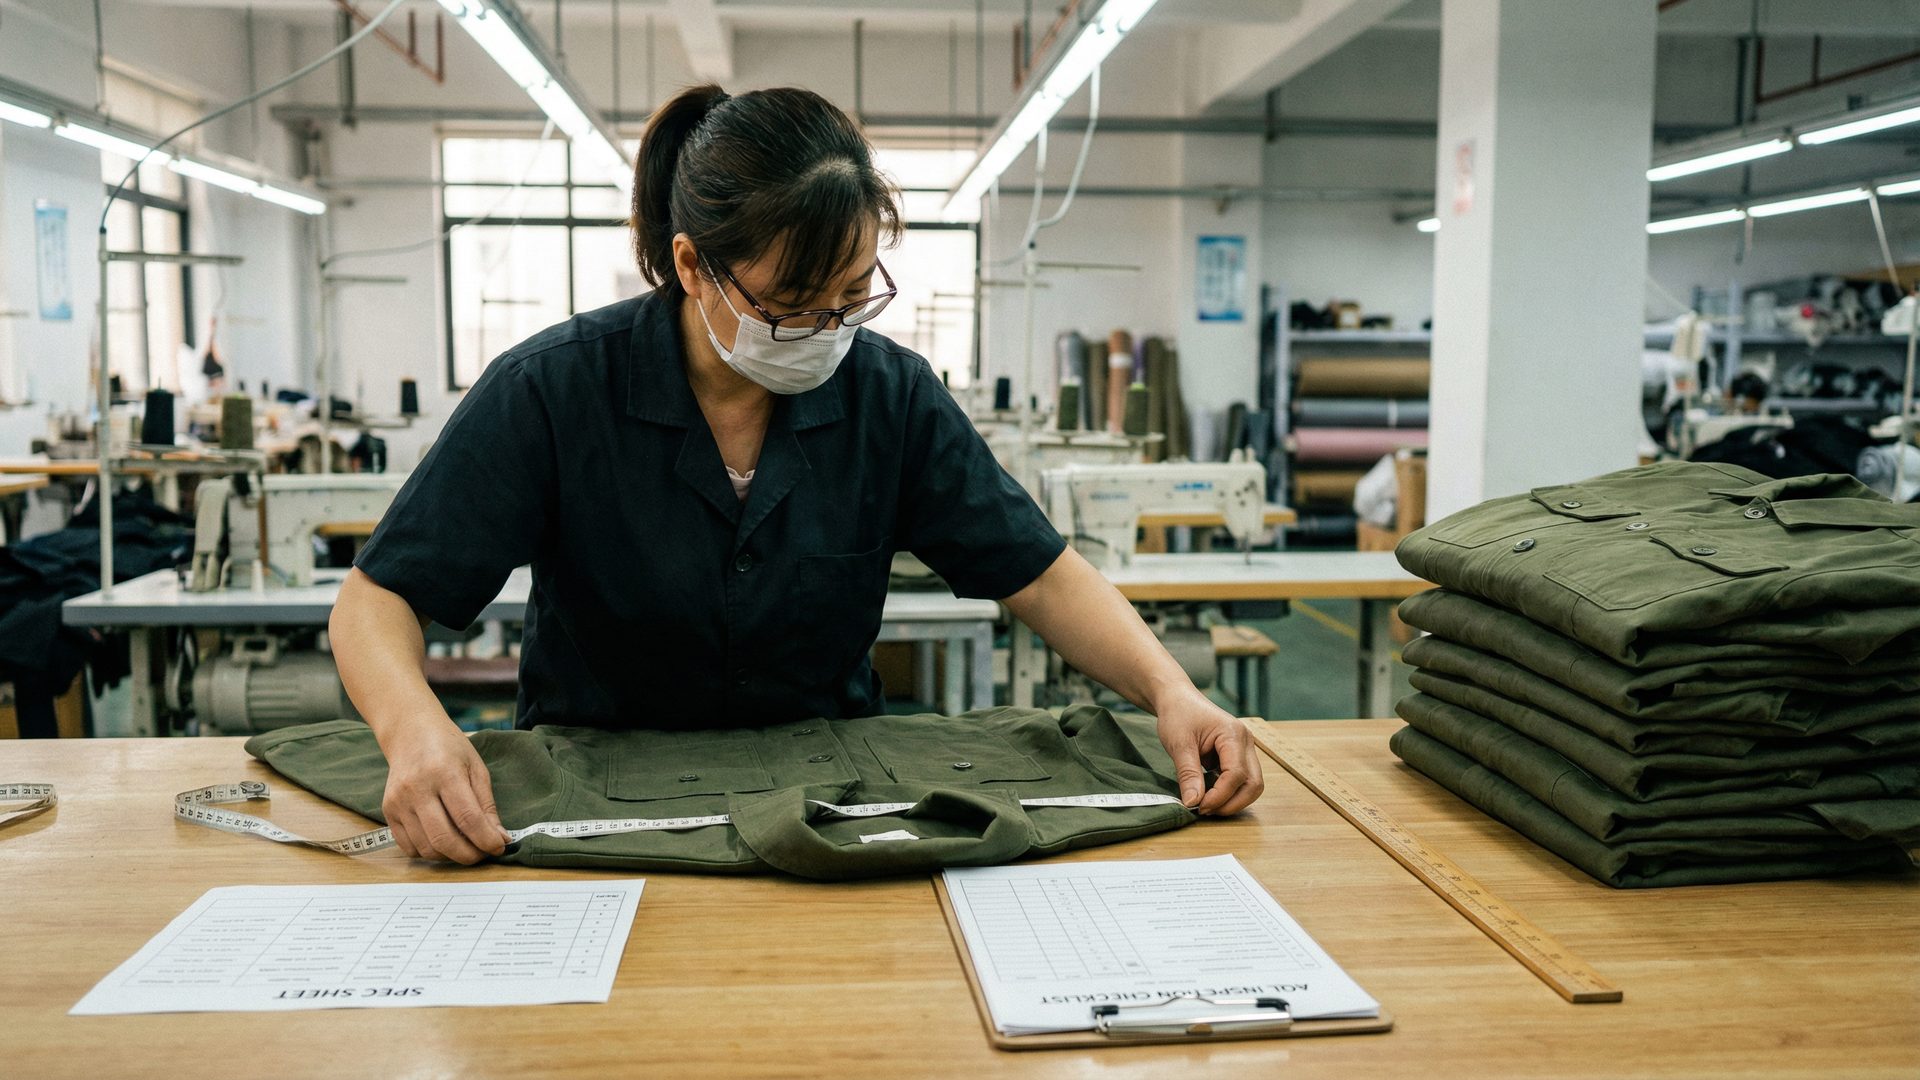
Chapter 9: The Art of Quality Control (QC)
Quality control is not a single step; it is a continuous process that should be integrated throughout your production run. Relying solely on the factory's internal QC is a common and often disastrous mistake. You must have your own system for verifying quality, either by hiring a third-party inspection service or by working with a full-package partner who has their own QC team on the ground.
The industry standard for quality control is the AQL (Acceptable Quality Level) inspection. AQL is a statistical sampling method that determines the maximum number of defective units that can be considered acceptable in a production batch. An inspector will use a standardized chart to select a random sample of garments from your production run and inspect them for defects. These defects are typically categorized into three levels:
• Minor Defects: Small imperfections that do not affect the saleability of the garment, such as a loose thread or a slightly crooked stitch.
• Major Defects: Issues that are likely to be noticed by the customer and could result in a return, such as a small stain, a misaligned graphic, or measurements that are outside the acceptable tolerance.
• Critical Defects: Severe issues that render the garment unsellable or could cause harm to the customer, such as a broken zipper, a sharp edge from a metal component, or incorrect labeling.
A typical AQL standard for consumer apparel is 2.5 for major defects and 4.0 for minor defects. This means that if the inspector finds more than 2.5% of the sampled garments have major defects, the entire production run should be flagged for review. It is critical that you establish your AQL standards with your factory before you sign the purchase order. This gives you the contractual leverage you need to hold the factory accountable for the quality of their work.
Beyond the final AQL inspection, there are two other critical QC checkpoints that you should insist upon. The first is an in-line inspection, which takes place during the production run, typically after the first 10-20% of units have been completed. This allows you to catch any systemic issues, such as a pattern error or a fabric defect, before they affect the entire run. The second is a pre-shipment inspection, which takes place after 100% of the production is complete and packed. This is your last opportunity to verify the quality of the goods before they leave the factory.
Chapter 10: Embellishments and Finishing (The Details That Define the Product)
In the premium apparel market, the details are everything. The embellishments and finishing techniques you choose can be the difference between a product that looks expensive and one that looks cheap, between a product that customers talk about and one that they forget. This is an area where working with a partner who has deep expertise and strong supplier relationships pays significant dividends.
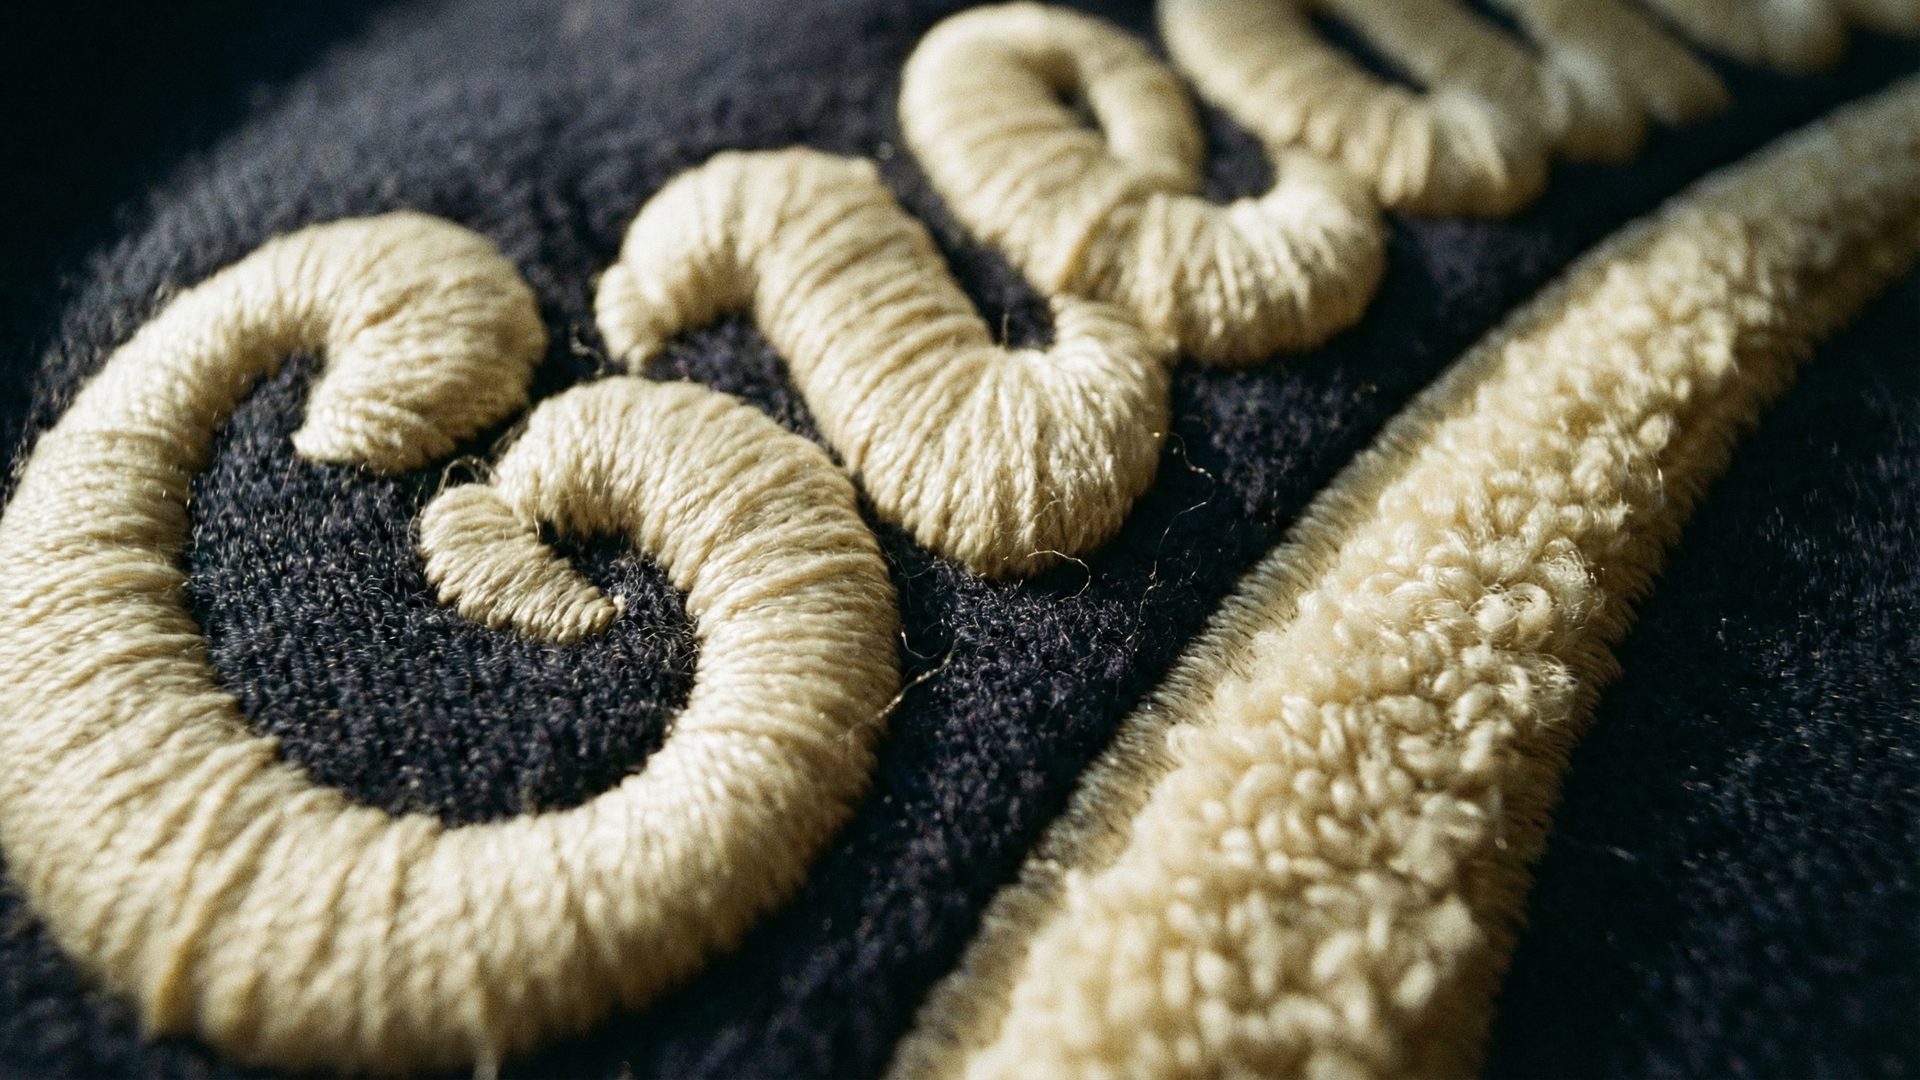
The most common embellishment in the premium market is embroidery, but not all embroidery is created equal. Standard flat embroidery is the baseline. 3D puff embroidery, which uses a foam underlay to create a raised, dimensional effect, is a significant step up in visual impact and perceived quality. Chenille embroidery, which creates a soft, textured pile similar to a varsity letter, is a highly sought-after technique that commands a premium price. Each of these techniques requires a different level of skill and equipment, and not every factory is capable of executing them at a high level.
Beyond embroidery, there is a growing world of premium finishing techniques that can dramatically elevate a garment. Garment dyeing, as discussed in the fabric section, creates a unique, vintage color quality. Vintage washing and enzyme washing create a soft, broken-in hand feel that customers love. Custom woven labels, heat-transfer labels, and embossed leather patches are all details that signal quality and craftsmanship. The brands that are winning in the premium market in 2026 are not just designing great silhouettes; they are obsessing over every single detail of the finished product.
Chapter 11: Case Studies in Cut-and-Sew Excellence
The principles and processes outlined in this guide are not theoretical. They are the playbook that the world's most ambitious and product-focused brands use to create apparel that builds culture, community, and a competitive moat. By looking at how these brands have leveraged cut-and-sew, we can see the power of a product-first mentality in action.
Case Study: Kill Crew and the Power of a Signature Product
Kill Crew, the rapidly growing athletic apparel brand, built its empire not on flashy graphics, but on a signature, custom-developed product: their shorts. In the hyper-competitive fitness market, they recognized that the standard, generic athletic shorts were not meeting the needs of serious lifters. They invested heavily in developing their own proprietary fabric, fit, and construction, creating a range of shorts that were purpose-built for the gym. This obsessive focus on a single product category, executed through a disciplined cut-and-sew program, created a product that was immediately recognizable and intensely desirable. Their customers are not just buying shorts; they are buying a piece of equipment that helps them perform at their best. This is a moat that cannot be replicated with a better graphic or a lower price. The lesson for any brand founder is clear: owning a product category is more powerful than owning a design.
Case Study: Anduril Industries and the Talent Signal
Anduril, the defense technology company, uses its highly sought-after employee and supporter merchandise as a powerful tool for recruiting and brand building. They do not offer generic, logo-slapped hoodies. Instead, they create premium, custom-developed pieces like their iconic flight jackets and heavyweight, garment-dyed hoodies. These are not just pieces of clothing; they are artifacts of a culture, signals to the world that the owner is part of an elite, mission-driven organization. By investing in high-quality, cut-and-sew products, Anduril has turned their merchandise into a status symbol, a way for their team and their biggest advocates to signal their affiliation. The lesson here is that the quality of your product communicates the quality of your brand. A cheap product sends a cheap signal.
Chapter 12: The Full-Package Partner (What to Look For)
For most brand owners making the transition to cut-and-sew, the single most important decision is whether to manage the process yourself or to work with a full-package partner. The answer, for the vast majority of brands at the growth stage, is to work with a full-package partner. The complexity of the process, the number of variables to manage, and the cost of mistakes all point to the same conclusion: the expertise and infrastructure of a good full-package partner is worth the investment.
But not all full-package partners are created equal. The standard in the industry is a company that can source fabric, manage the factory, and ship the finished goods. The best partners go significantly further. They have an in-house creative team that can help you develop your product concept, access to trend information from major retailers and brands, and the production capabilities to execute advanced techniques like garment dyeing, vintage washing, and premium embellishment. They are not just a logistics provider; they are a creative and strategic partner who is invested in the success of your brand.
When evaluating a full-package partner, look for a company that leads with quality and customer experience, not speed and price. Look for a company that has a deep portfolio of work in your product category and can show you specific examples of the techniques you want to execute. Look for a company that is transparent about their process, their pricing, and their capabilities. And look for a company that treats you like a partner, not a transaction. The right full-package partner will feel less like a vendor and more like an extension of your own team.
Chapter 13: Logistics and Freight
Once your production run is complete and has passed its final QC inspection, the last step is to get the product from the factory to your warehouse or fulfillment center. This process, known as logistics or freight forwarding, is a specialized field with its own set of complexities. For most brands, it is highly recommended to work with a professional freight forwarder.
A freight forwarder is a company that manages the entire shipping process for you. They will book the transportation (either air freight or sea freight), handle all of the required customs documentation, and ensure that your goods are cleared for entry into your destination country. Trying to manage this process yourself is a significant undertaking that can easily lead to costly delays and legal issues.
When you receive a quote from a freight forwarder, it will typically include the cost of transportation, insurance, customs brokerage fees, and any applicable duties and taxes. It is important to understand that duties and taxes are determined by the customs agency of the destination country and are based on the type of product and its declared value. These fees are non-negotiable and must be paid before your goods will be released from customs. A good freight forwarder will help you to properly classify your products to ensure that you are paying the correct amount of duty.
The choice between air freight and sea freight is primarily a function of time and cost. Air freight is significantly faster (5-10 days from most manufacturing countries to the US) but can cost 4-6 times more than sea freight. Sea freight is much more economical for large shipments (typically 30-45 days from Asia to the US West Coast) but requires much more lead time in your planning. For most brands, sea freight is the right choice for planned, seasonal production runs, while air freight is reserved for urgent replenishment orders or time-sensitive launches.
Part 4: The Creative Edge (Advanced Techniques for Product-First Brands)
Once you have mastered the fundamentals of cut-and-sew production, the next frontier is leveraging advanced creative techniques to build a product that is not just well-made, but genuinely distinctive. This is where the gap between a good brand and a great brand is created, and it is where a partner with deep creative expertise and strong supplier relationships becomes invaluable.
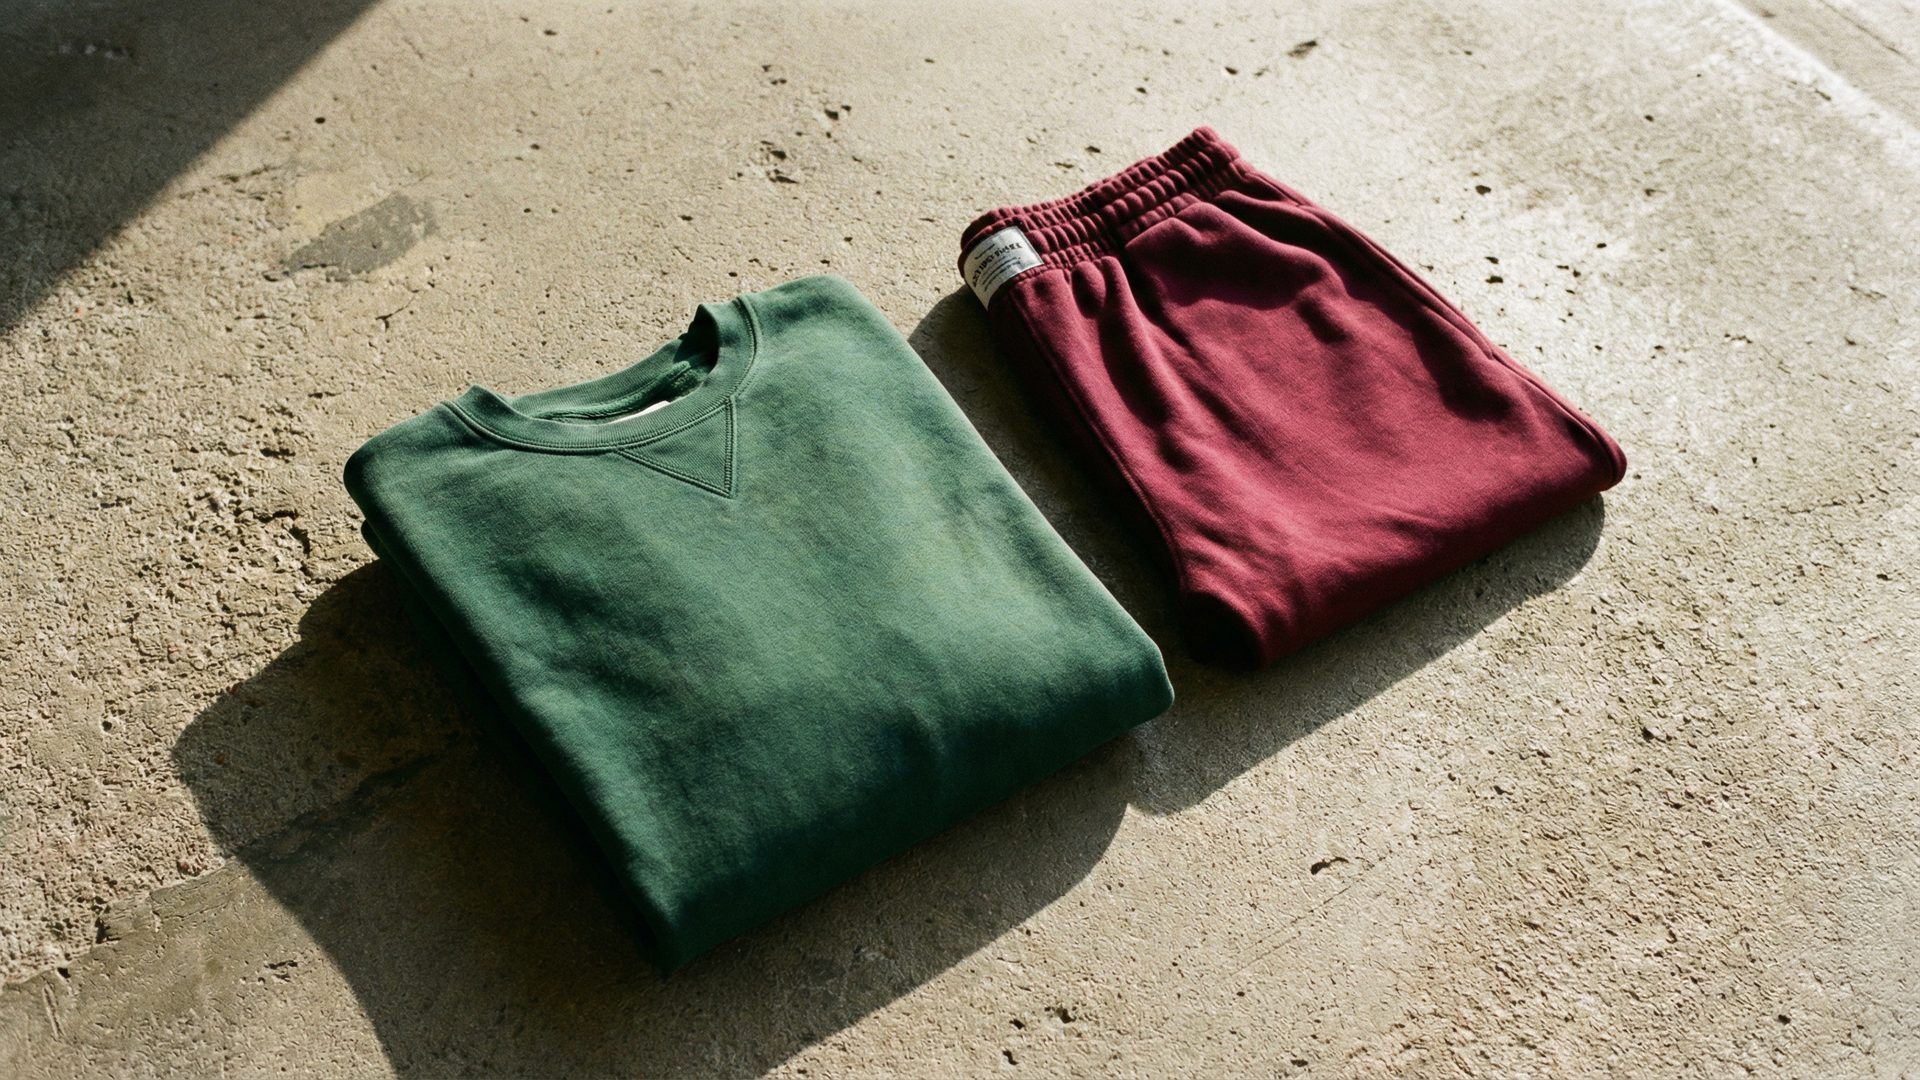
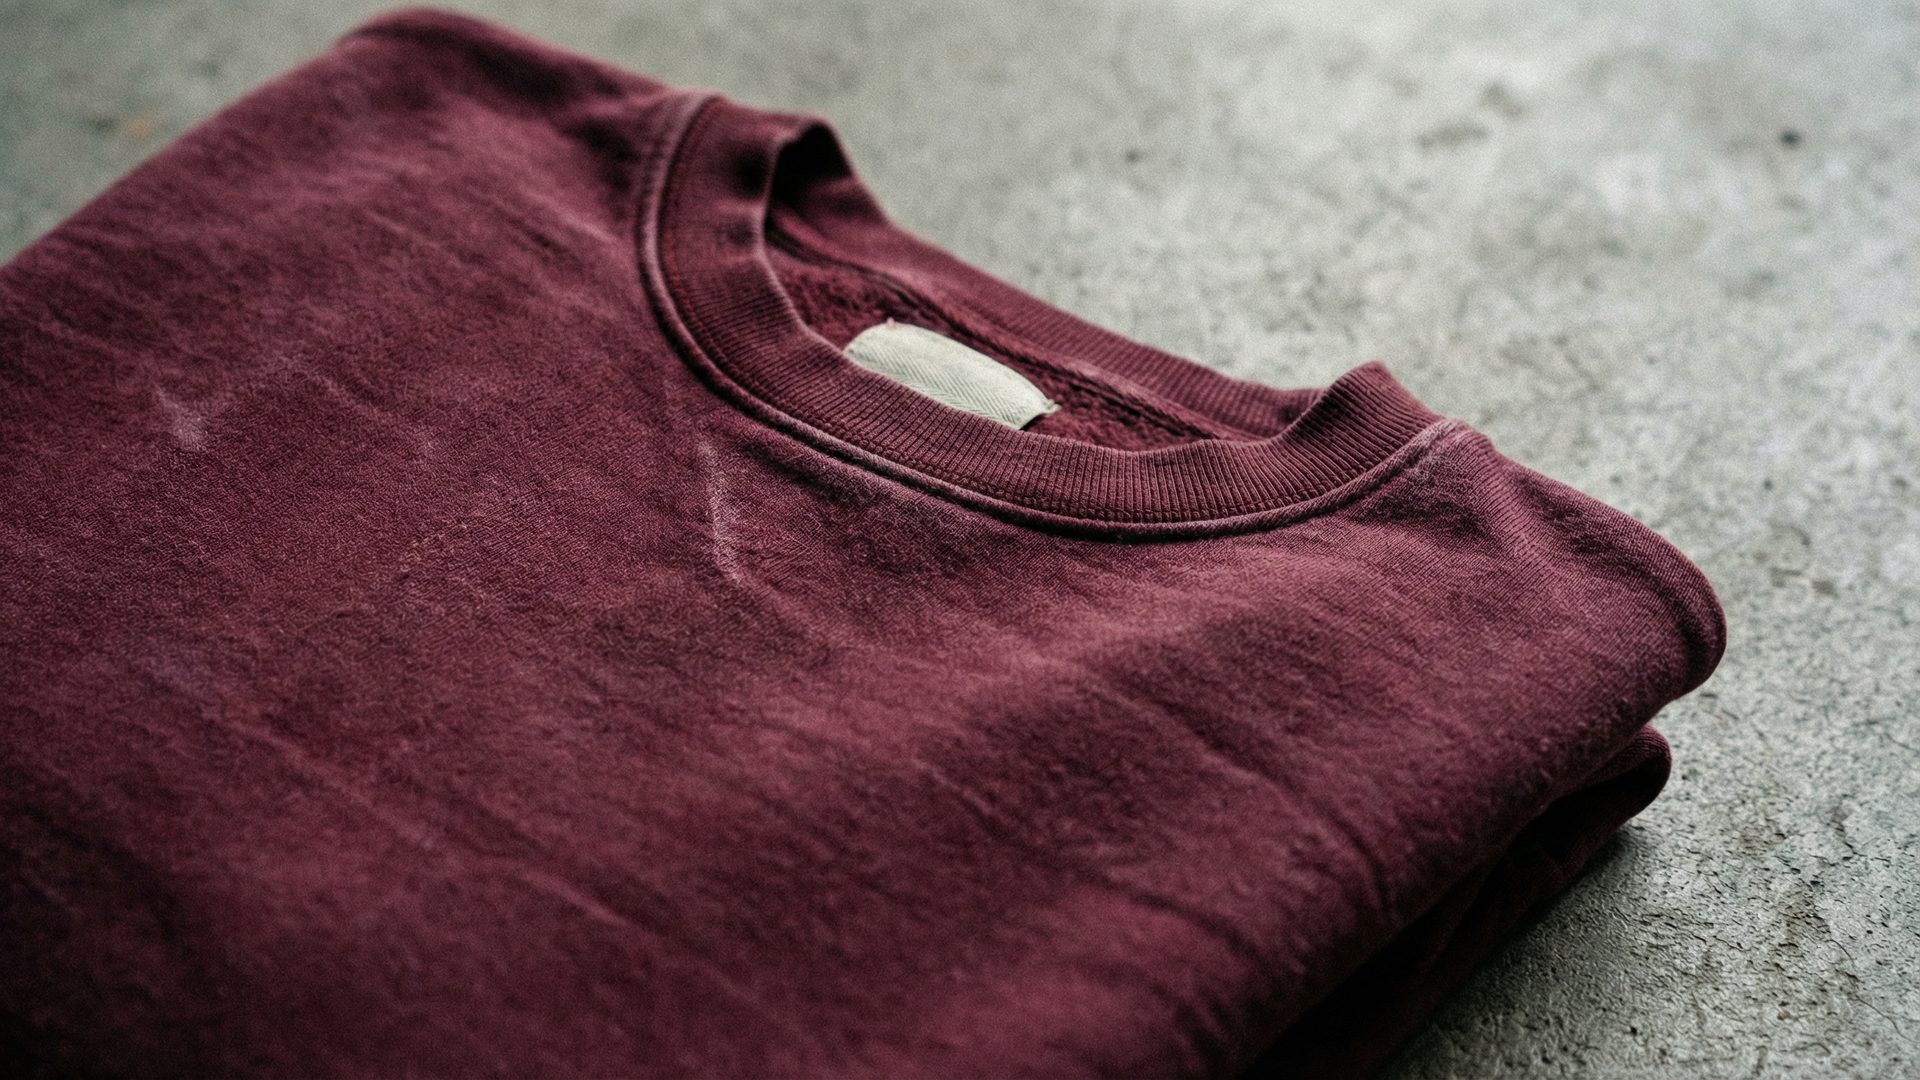
Chapter 14: The Garment Dye Advantage
Garment dyeing is one of the most powerful tools available to a premium apparel brand, and it is also one of the most misunderstood. The process is deceptively simple in concept: instead of using pre-dyed fabric, you sew the garment first and then dye it. But the results are anything but simple. Because the garment is dyed as a finished piece, the dye penetrates the fabric unevenly, creating subtle variations in color intensity at the seams, the ribbing, and the edges of the garment. This is not a defect; it is the defining characteristic of a garment-dyed piece, and it is the quality that makes customers feel like they are wearing something unique and special.
The most sought-after garment dye technique in the current market is the pigment dye, which uses a surface-applied pigment rather than a reactive dye that penetrates the fiber. Pigment-dyed garments have a distinctly faded, vintage quality that is impossible to replicate with conventional dyeing methods. The color sits on the surface of the fabric, which means it will fade and soften with washing, creating a garment that gets better with age. This is a powerful brand story: your product is not just well-made at the moment of purchase; it is designed to become more personal and more beloved over time.
The key to a successful garment dye program is understanding that the process requires a very specific type of fabric. Not all fabrics are suitable for garment dyeing; the fabric must be undyed (greige) at the time of sewing, which means you cannot use pre-dyed components like colored zippers or buttons. This requires careful planning and a close collaboration with your factory to ensure that all components are compatible with the dyeing process. A good full-package partner will have established relationships with garment dye facilities and will be able to guide you through the technical requirements.
Chapter 15: Building a Sampling Review Process That Works
The sampling process is where most brands lose time, money, and momentum. The primary reason is not a lack of skill on the factory's part; it is a lack of clarity and structure in the brand's review process. When you receive a sample, you need to be able to evaluate it systematically and communicate your feedback in a way that the factory can act on. Vague feedback like "the fit is off" or "the color is not right" is not actionable. Specific, documented feedback is.
Develop a standardized sample review form that you use for every sample you receive. This form should include a section for measuring the garment against your spec sheet, a section for evaluating the construction quality (seam allowances, stitch density, finishing), a section for evaluating the fabric (hand feel, weight, color accuracy), and a section for any other comments or corrections. When you document your feedback in this structured way, you create a clear record of the changes that need to be made, and you make it much easier for the factory to understand and implement your corrections.
Photography is also a critical part of the sample review process. When you identify an issue with a sample, photograph it from multiple angles and annotate the photos with clear callouts. A photo of a collar that is sitting incorrectly, with an arrow pointing to the problem and a note explaining the correction, is worth a thousand words of written description. Many brands now use collaborative tools like Loom or Notion to create structured sample review packages that combine photos, measurements, and written comments in a single, easy-to-navigate document. This level of organization signals to your factory that you are a professional partner, and it dramatically reduces the number of sampling rounds required.
Chapter 16: The Creative Brief (Communicating Your Vision)
Before you can create a tech pack, you need to be able to articulate your creative vision in a way that a technical designer can translate into a specification. This is the role of the creative brief, a document that captures the aesthetic, the mood, and the key design elements of your product before any technical work begins.
A strong creative brief for an apparel product should include a mood board, a set of reference images that capture the aesthetic you are going for, and a written description of the product's intended customer, use case, and key design features. It should also include any specific technical requirements you have identified, such as a particular fabric weight, a specific construction technique, or a desired fit profile. The more specific and visual your creative brief, the more accurately your technical designer will be able to translate it into a tech pack.
Reference garments are one of the most powerful tools in the creative brief. If there is an existing garment in the market that captures the fit, the construction, or the aesthetic you are going for, include it in your brief. You are not asking your factory to copy the garment; you are using it as a communication tool to ensure that everyone on the team has the same mental image of what you are trying to create. A reference garment can communicate a fit profile, a seam construction, or a fabric weight more clearly than any written description.
The Definitive Cut-and-Sew Timeline (A Reference Guide)
Understanding the full timeline from concept to customer is essential for planning your production calendar. Below is a realistic reference guide for a standard cut-and-sew production run.
Phase | Activities | Realistic Timeline |
Concept and Design | Mood boarding, sketch development, fabric research, tech pack creation | 4-6 weeks |
Sourcing and Costing | Factory outreach, fabric sourcing, costing and negotiation | 2-4 weeks |
Proto Sampling | Factory creates first sample, brand reviews and provides feedback | 3-4 weeks |
Fit Sampling | Revised sample in correct fabric, fit review and adjustments | 2-3 weeks (per round) |
Pre-Production Sample | Final "golden sample" approval | 2-3 weeks |
Bulk Production | Raw material procurement, cutting, sewing, finishing, packing | 45-75 days |
Quality Control | In-line and pre-shipment inspections | 1-2 weeks |
Logistics and Freight | Sea freight (30-45 days) or air freight (5-10 days) | 1-6 weeks |
Receiving and Fulfillment | Warehouse receiving, inventory, fulfillment setup | 1-2 weeks |
Total (Sea Freight) | 6-9 months |
This timeline assumes a relatively smooth process with a reliable partner. First-time brand owners should add an additional 4-6 weeks of buffer to account for the learning curve and unexpected challenges.
The Finishing & Embellishment Encyclopedia
Mastering the language of finishing and embellishment is critical to creating a product with a distinct point of view. These techniques are not just add-ons; they are fundamental to the product's character and perceived value. Below is a more detailed look at the most impactful options available to a product-first brand.
Wet Processing & Finishing
These techniques are applied to the garment after it has been sewn, fundamentally altering the fabric's color, texture, and hand-feel.
• Garment Dyeing: This is the cornerstone of the premium, lived-in aesthetic. Instead of using pre-dyed fabric, the finished garment is dyed in a large-batch machine. This process creates subtle color variations at the seams and edges, giving each piece a unique character. It also results in an exceptionally soft hand-feel. The cost premium is significant (+$5-15 per unit) because it requires specialized fabrics (Prepared for Dye or PFD) and a dedicated dye house, but it can justify a retail price increase of $30-50 or more.
• Pigment Dyeing: A sub-category of garment dyeing, this technique uses a pigment that bonds to the surface of the fabric rather than a dye that penetrates the fibers. The result is a more pronounced high-low color effect, creating a faded, sun-beaten look that gets better with every wash. It's the secret behind many of the most sought-after vintage-inspired hoodies and tees.
• Enzyme Washing: This process uses cellulase enzymes to break down some of the cellulose in the cotton fibers, resulting in a dramatically softer, smoother fabric with a slightly worn-in look. It's a more controlled and consistent way to achieve a vintage hand-feel than traditional stone washing and is a standard finish for premium fleece and jersey.
• Silicone Washing: A treatment that adds a very light coating of silicone to the fabric, resulting in a slick, cool, and exceptionally soft hand-feel. This is often used on premium t-shirts to give them a luxurious, drapey quality.
Embellishment & Decoration
These are the techniques used to apply graphics, logos, and other decorative elements to the garment. The choice of technique has a massive impact on the product's perceived quality.
• 3D Puff Embroidery: This technique involves stitching over a foam underlay, creating a raised, three-dimensional effect that is impossible to ignore. It's a bold, high-impact embellishment that signals a premium product and is perfect for logos and key brand graphics. The cost is higher than standard embroidery due to the multi-step process, but the perceived value is exponentially greater.
• Chenille Embroidery: This technique creates a soft, textured pile similar to a classic varsity letter. It involves stitching loops of yarn onto a felt backing, resulting in a rich, tactile embellishment with a nostalgic, premium feel. It is significantly more expensive than standard embroidery but is a powerful way to create a hero piece in a collection.
• High-Density Printing: A screen printing technique that uses a special type of ink and a thick stencil to create a raised, rubbery print with sharp, defined edges. It's a modern, technical alternative to embroidery for achieving a dimensional effect and is often used on performance-oriented garments.
• Woven Labels & Patches: Moving beyond a standard printed neck label to a custom-woven label is a small detail that makes a huge difference. Woven labels, whether applied at the neck, hem, or sleeve, communicate a level of craftsmanship and attention to detail that is the hallmark of a true product-first brand. Woven patches, applied with a satin stitch border, are a classic way to add branding to outerwear and headwear.
The Conclusion: The Product Is the Brand
The journey from blanks to cut-and-sew is a marathon, not a sprint. It is a process that demands patience, precision, and a deep respect for the craft of apparel manufacturing. The brands that succeed are not the ones that look for shortcuts, but the ones that invest in the right partners, the right processes, and the right mindset. They understand that the product is the brand, and that a well-made garment is the most powerful marketing tool they will ever have.
By following the playbook laid out in this guide, you are not just learning how to make a product; you are learning how to build a defensible, product-first brand. You are moving beyond the crowded world of decorated blanks and entering the more challenging, but ultimately more rewarding, world of true product creation. The path is not easy, but for those who are willing to do the work, the rewards are immeasurable.
If you are ready to make the leap and want a partner who can guide you through every step of the process, from initial concept to finished product, HH is built for exactly this moment. Our in-house creative team, our access to premium trend intelligence, and our full-package production capabilities exist to help ambitious brands like yours build products that are worth talking about. The best brands in the world are not the ones with the biggest marketing budgets; they are the ones with the best products. Let's build something great.
Frequently Asked Questions
How much does it cost to start a cut-and-sew clothing brand?
A realistic starting budget for a first cut-and-sew production run of 5-6 styles at standard MOQs is approximately $15,000, covering sampling and bulk production. That figure will shift depending on the complexity of your finishing — garment dyeing, premium embellishment, and custom trims all carry meaningful cost premiums per unit. The most important variable is not the per-unit cost in isolation; it is the total number of units committed across your range and the finishing specifications you lock in before production begins. For most brands entering cut-and-sew for the first time, starting with a focused 5-6 style range at MOQ is the most capital-efficient path to building a real product program.
What is a realistic MOQ for a first cut-and-sew production run?
For most cut-and-sew programs, realistic MOQs start at 144 or 288 units per style, per color. These numbers are not arbitrary; they are tied to the economics of fabric minimums and factory floor efficiency. For more complex styles or larger, higher-capacity factories, the starting MOQ can be 600 units or more. The key variable is the style itself: a simple heavyweight crewneck in a single color will have a lower MOQ than a multi-panel, garment-dyed jacket with custom hardware. It is important to understand your MOQ requirements before you finalize your range, as they directly determine how much capital you need to commit upfront. As your volume grows, your leverage to negotiate lower MOQs and better per-unit pricing increases significantly.
How long does the cut-and-sew process take from concept to customer?
A typical timeline from initial concept to having the finished product in your warehouse is between 6 and 9 months. This includes 4-6 weeks for design and tech pack creation, 2-4 weeks for sourcing and costing, 6-10 weeks for the sampling process, 45-75 days for bulk production, and 1-6 weeks for logistics depending on whether you use air or sea freight. Rushing any of these stages is one of the most common and costly mistakes a brand can make.
Do I need to be a designer to start a cut-and-sew brand?
No, you do not need to be a designer, but you do need to have a clear creative vision and the ability to communicate it effectively. Many successful brand founders are not designers themselves, but they are skilled at hiring and managing creative talent. Working with a freelance technical designer or a full-package partner who has an in-house design team is a great way to bridge this gap. What matters most is that you have a strong point of view on what you want to create and the discipline to see the development process through.
What is the difference between a tech pack and a spec sheet?
A spec sheet is a component of a tech pack, but it is not the whole document. A spec sheet typically refers to the garment measurement chart, which lists the measurements for each size. A complete tech pack is a much more comprehensive document that includes technical sketches, a bill of materials, construction details, color standards, and embellishment specifications, in addition to the spec sheet. A factory needs a complete tech pack to build your product; a spec sheet alone is insufficient.
Should I work directly with a factory or use a full-package partner?
For a first-time brand owner, it is highly recommended to work with a full-package partner. While it may seem more expensive on a per-unit basis, a good full-package partner will save you from countless costly mistakes and will manage the entire complex process for you. The expertise and peace of mind they provide is well worth the investment. Going direct to a factory makes sense only once you have significant production experience, a strong internal team, and the volume to justify the added complexity.
What is garment dyeing and why is it so popular in premium apparel?
Garment dyeing is a process where the finished garment is dyed after it has been sewn, rather than using pre-dyed fabric. This creates a unique, slightly uneven color quality with subtle variations from piece to piece, giving each garment a distinctive, lived-in character. It also produces a softer hand feel than piece-dyed fabric. Garment dyeing is popular in the premium market because it creates a product that looks and feels genuinely special, rather than mass-produced. The process adds $5-15 per unit to the cost of production but can justify a retail price premium of $30-50 or more.